Home
 Products
 Other Products...
 New: devFoam 3
 New: devWing Foam 2
 New: devSim Cnc Foam
 devFus Foam 2
 devCnc Foam
 devWing Foam
 Download
 Tutorials
 F.A.Q.
 Requirements
 Prices and Purchasing
 Customer Support
 Upgrade
 Partners
 Usb key
 New: Forum!
 Privacy


DevCnc Foam by the devCad Team


DevCnc Foam, Arduino Uno + Cnc Shield 3.00

Supported controllers page - Arduino Uno + Cnc Shield 3.00

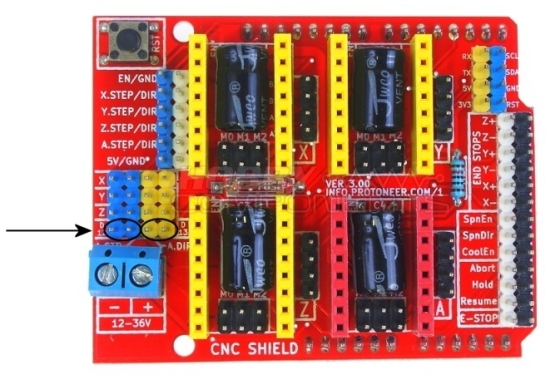
The Arduino Uno + Cnc Shield 3.00 is a well known couple.
It includes what is required to build in a simple way a powerful foam cutting controller:

  • 4 stepper drivers.
  • limit switches input. We will use 2 of them, one for each carriage
  • very simple wiring. Cnc Shield 3.00 fits directly on the Arduino Uno board, and the stepper motor output are already ready to use with a standard 4 pin dupont connector, the most used by stepper motors.

So, why this solution isn't actually used in the Foam cutting world?
The answer is in the lacking of a Firmware for Arduino, able to manage the 4 independent linear axes in the way required by cnc foam cutting.
That's why the devCad Team developed a totally new Firmware, optimized for Arduino Uno + Cnc Shield 3.00.
This firmware will be stored inside Arduino Uno directly on devCnc Foam startup, when you select it as the actual controller.
So you don't need to begin an Arduino expert, but just:

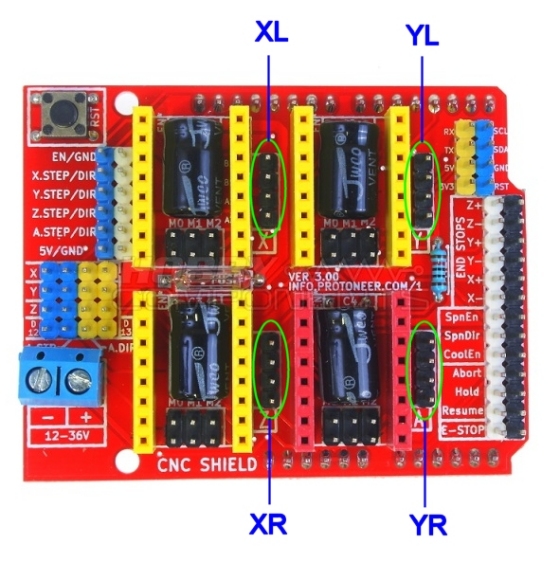
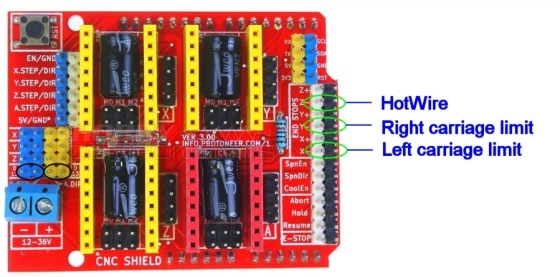
  • apply the right wiring (no soldering is requested)
  • calibrate the stepper drivers (they usually are already set to a good enough value, but checking it is recommended)
  • plug in the Arduino Usb port
  • select Arduino Uno + Cnc Shield 3.00 in the "Controller type and output pins" page of the "Settings dialog"

At this point all the firmare setup will be performed by devCnc Foam, you must only set the right Steps per MM values of your Cnc, see the "Motors" page of the "Settings dialog".

You can find here the Step by Step guide to setup your Arduino Uno + Cnc Shield 3.00 controller:

  • Gently connect the Cnc Shield 3.00 shield into the Arduino Uno. Check carefully all the pins are straight, or you can have problems in this operation
  • Set the right micro step value for each driver stepper , inserting the supplied jumpers in the pins. You can find the table of the pins to jump in the documentation of the stepper drivers you use, search it in the web.
    Here below you can see where the microsteps pins are located for each axis.
    A good starting value can be 1/8. You can select an higher value to have max movements smoothness, a lower value to have higher max speed.
  • Insert the stepper drivers. Pay attenction to insert them rotated in the right way. The Enable pin must be located at top side, watching the supplied image. See the above picture as a reference.
  • Insert the jumpers to select the A axis as indipendent . The 2 jumpers must be plugged according the supplied image:

  • Connect the power cables. The Cnc Shield 3.00 shield have just one power inputs, usually at 12 volts, min 5A. The Blue connector is well labeled in the left bottom side of the shield

  • Calibrate the stepper drivers. To calibrate the steppers drivers you must use the procedure suggested by the stepper driver manual, find it in the web. This can slightly change for each stepper driver model.
    We suggest not to set the higher possible current. If your machine carriages run smooth (as should be!), a medium current value is better.
  • Connect the stepper motors. See the below picture.
  • Connect the optional EndStop/Limit switches and HotWire control circuit.
    This connections don't requires an external pull up resistor, as it's already supplied internally.
    Cause the limited number of available digital pins of Arduino Uno, just two pins are used, one for the Left and one for the Right carriage, read also "Hard Limits".
    To optionally drive the Hotwire you can use the displayed pin, and connect it to it your circuit/board. It can be for example an electronic switch or a mosfet circuit. Read carefully the Arduino Uno data sheet.
     
  • Select the Arduino Uno + Cnc Shield 3.00 option in the "Controller type and output pins" page of the "Settings wizard, insert the proper values in the "Motors" page, and setup the optional "Hard Limits"  and "Hot wire management.
    When closing the "Settings wizard" devCnc Foam will check and eventually upload the right firmware you are ready to go!
Home  |  Forum  |  Contact   
Copyright 2006/2024 - All rights reserved - P.IVA n.00860190255 info@devcad.com